
nSpec v0.24.0.0 External Release Notes
nSpec Version 0.24.0.0
Release Date:
Documentation Updated:
Major Features: Device Yield Analysis, Device Yield Report, Multi-Sided Sample Scans
Overview
nSpec v0.24.0.0 includes many new features and quality of life updates, such as:
Device Yield Analysis: Automate device yield calculations for a given sample.
Multi-sided sample scanning: Scan samples with more than two sides with the addition of a wafer-flipping module.
Lot ID: Scan settings include a field for Lot IDs.
String templates: Dynamically insert fields like
SAMPLE_IDorDATETIMEto analysis export file names.
Additionally, this update includes changes to the database schema, and will require updates to nJson files referencing deprecated portions of the old database schema. Nanotronics Technical Service will assist with this upgrade process.
Upgrading to v0.24.0.0
Upgrading Instructions
Library Update Not Required
If upgrading from a version more than 1 release prior, please reference all intermediate release notes for upgrade steps for each version.
Automatic Database Upgrade
WARNING: This version contains an automatic database upgrade process to update the database schema. Old nJson files that reference the old database schemas must be updated with the support of Nanotronics Technical Support.
This database upgrade process happens once a database is used in nSpec v0.24.0.0. The first time an old scan is used, the upgrade will occur and make the typical analysis process a little slower.
Once the upgrade is complete, the new upgraded scan databases cannot be used in previous nSpec versions. If needed, backups of the old scan databases should be must be made before performing any scans in nSpec v0.24.0.0.
nDraw Known Issue
Customers reliant on nDraw should not upgrade to nSpec v0.24.0.0 or beyond until its replacement is completed.
Major Enhancements
Device Yield Analysis
Overview
Device Yield analysis allows users to quickly calculate the device yield for a given sample. Then, given the device yield, the analysis assigns the sample a pass or fail status.
Each device on the sample is sorted into a user-defined bin. Each bin has a set of user-defined passing criteria. In order for an entire sample to pass, the percentage of devices that pass must exceed the user-set threshold.
Most Device Yield parameters are written with SQL queries, so knowledge of SQL is required to write the nJson setting file. For assistance with setup, contact support@nanotronics.ai.
This analysis is typically set up as a group analysis in a production environment, in which the Device Yield analysis runs after a Device Inspection analysis that detects sample defects.
Analysis Parameters
Device Yield analysis contains four parameters: Base Analysis ID Mode, Base Analysis ID, Device Yield Threshold, and Device Yield Setting.
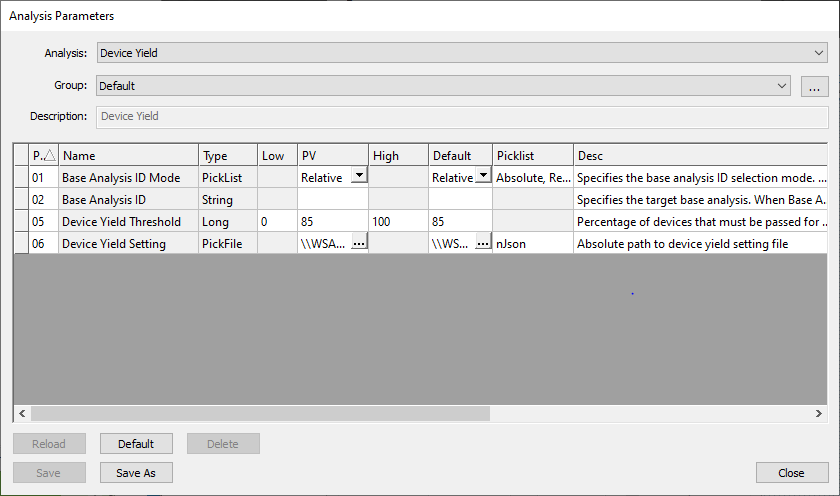
Device Yield Analysis Parameter dialog
Parameter Description
Parameter Name | Type | Range | Description |
|---|---|---|---|
Base Analysis ID Mode | Picklist | Absolute, Relative | See Post-Analysis Referencing for usage instructions. |
Base Analysis ID | String | Comma separated list of IDs or analysis names. | See Post-Analysis Referencing for usage instructions. Must point to a previous analysis that outputs devices, like Device Inspection. |
Device Yield Threshold | Long | 0 to 100. | Represents the percentage of devices on a sample that must meet passing criteria in order for the entire sample to pass. |
Device Yield Setting | nJson File | Setting file defines bins and bin-specific passing criteria for a given sample. |
Device Yield Setting Parameter
The Device Yield Setting nJson file contains analysis configuration details, including bin definitions and nView report settings, .
Example nJson File
Below is an example Device Yield Setting nJson file.
{
  "Device Report": {
    "inputTablesNames": "src",
    "BinFallThrough": 1,
    "PassColor": "64FF64",
    "FailColor": "FF6464",
    "Filtering"	  :
	{
		"Inclusive" : true,
		"query"     : "SELECT DeviceID FROM vwDevice"
	},
    "Bins": [
      {
        "description": "Perfect",
        "value": 1,
        "pass": true,
        "color": "ADD8E6"
      },
      {
        "description": "Very Good",
        "value": 2,
        "pass": true,
        "color": "E0FFFF"
      },
      {
        "description": "Good",
        "value": 3,
        "pass": true,
        "color": "FFB6C1"
      },
      {
        "description": "Almost Good",
        "value": 4,
        "pass": false,
        "color": "FFA07A"
      },
      {
        "description": "Not Good",
        "value": 5,
        "pass": false,
        "color": "20B2AA"
      }
    ],
    "BinsQueries": [
      {
        "bin": 1,
        "priority": 5,
        "query": "SELECT DeviceID, Count(*) AS AddDesc FROM src GROUP BY DeviceID HAVING Count(*) < 300"
      },
      {
        "bin": 2,
        "priority": 4,
        "query": "SELECT DeviceID, Count(*) AS AddDesc FROM src GROUP BY DeviceID HAVING Count(*) >= 300 AND Count(*) < 400"
      },
      {
        "bin": 3,
        "priority": 3,
        "query": "SELECT DeviceID, Count(*) AS AddDesc FROM src GROUP BY DeviceID HAVING Count(*) >= 400 AND Count(*) < 500"
      },
      {
        "bin": 4,
        "priority": 2,
        "query": "SELECT DeviceID, Count(*) AS AddDesc FROM src GROUP BY DeviceID HAVING Count(*) >= 500 AND Count(*) < 1000"
      },
      {
        "bin": 5,
        "priority": 1,
        "query": "SELECT DeviceID, Count(*) AS AddDesc FROM src GROUP BY DeviceID HAVING Count(*) >= 1000"
      }
    ]
  }
}
nJson File Properties
Bins
The Bins property includes the following nested properties:
descriptiona string to name the given bin.valuean integer used to identify and reference the bin.passa boolean representing if devices sorted into the given bin pass or fail.colora string representing a color in hex code, which is used to label devices of the given bin in Device Yield nView reports.
In the example nJson file, the user defines five bins. Devices sorted into "Perfect", "Very Good", and "Good" bins as are assigned a passing value, and devices sorted into "Almost Good" and "Not Good" bins are assigned a failing value.
BinsQueries
The BinsQueries property includes the following nested properties:
binan integer referencing aBinproperty’svalueproperty.priorityan integer representing the order in which theBinsQueriesshould evaluate a device.querya SQL query that defines which devices are assigned to the given bin.
In the example nJson file, the devices are sorted into bins based on the device’s defect count. The "Not Good" bin contains devices with more than 1000 defects, and "Perfect" contains devices with less than 300 defects.
BinQueries are also given priorities. If a device can be sorted into more than one bin, it will be assigned to a bin via the order defined by the priority.
Here, the condition for bin 5 or "Not Good" is checked first because it has a priority of 1. We recommend checking the most critical defect conditions first.
BinFallThrough
If every bin is checked and the given wafer does not meet the criteria for any of the bins, the device is sorted into the bin defined via the BinFallThrough.
In this example, the fall through bin is 1, or "Perfect".
inputTablesNames
This property defines a name for the input SQL table, which includes all of the relevant scan data for a given sample.
In this example, the input table is named src, and is referenced in the BinsQueries' nested property SQL query.
Filtering
Filtering is an optional property which creates a temporary filtered view of the scan database for BinQueries to parse.
The query nested property is the SQL query used to filter the database. The Inclusive nested property is a boolean that determines if the database entries that meet the filter query condition are included or excluded from the output.
PassColor / FailColor
PassColor and FailColor determine the colors that the sample’s passing and failing devices are labeled with in the nView Device Yield Report.
Writing SQL Queries
SQL queries should query the scan database’s vwDevices table, which contains defect details.
For example, defects can be sorted into bins by the type of defects found and/or the size of those defects. See below for all column names in the vwDevices table.
Here is an example of a query filters the input table for defects with defect type “EXTREMELY_BAD_DEFECT_TYPE” that are larger than 15 µm2.
"SELECT DeviceID, Area, ClassName FROM src WHERE Area >= 15 AND ClassName = \"EXTREMELY_BAD_DEFECT_TYPE\" GROUP BY DeviceID"vwDevices Column Names
Column Name | Data Type |
|---|---|
DefectID | INTEGER |
ImageID | INTEGER |
AnalysisID | INTEGER |
DeviceID | INTEGER |
X | REAL |
Y | REAL |
W | REAL |
H | REAL |
Area | REAL |
Eccentricity | REAL |
Orientation | REAL |
XinDevice | REAL |
YinDevice | REAL |
ClassID | INTEGER |
Score | REAL |
Contour | TEXT |
ClassName | VARCHAR |
Device Yield Report
Overview
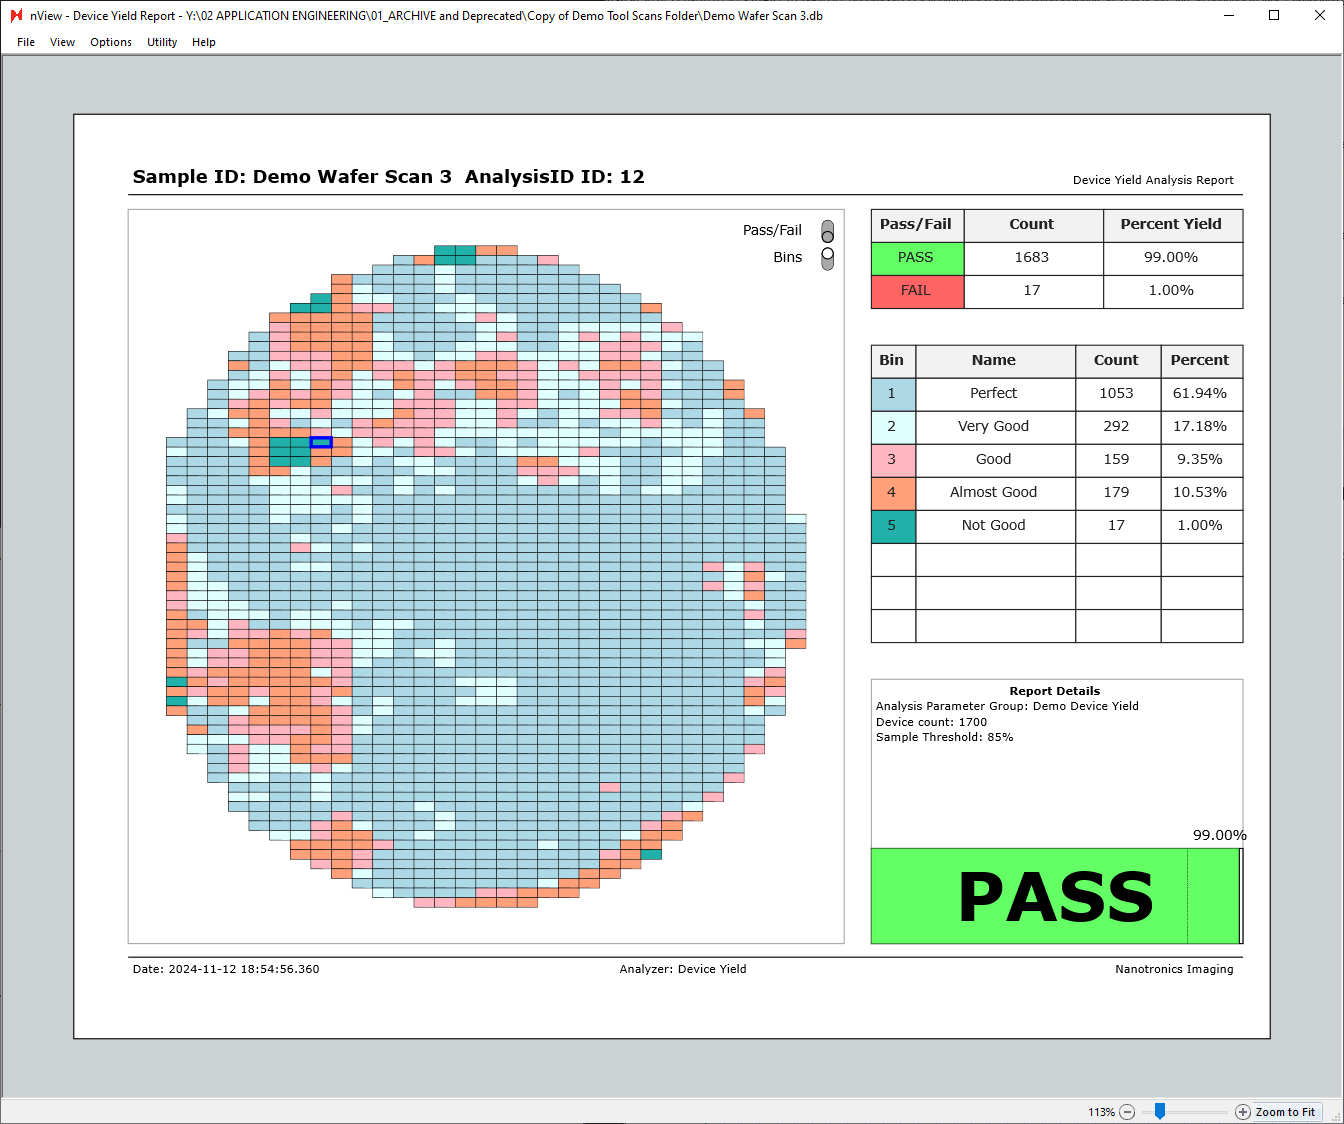
After successfully running Device Yield analysis on a defect-type scan, the analysis results can be viewed in nView. The Device Yield report can be viewed by accessing nView > View > Device Yield Report or Ctrl+ 7.
Device Yield Report Views
The Device Yield report has multiple different views that can be seen by toggling Pass/Fail and Bins, in addition to hovering over individual pass/fail or bin table rows.
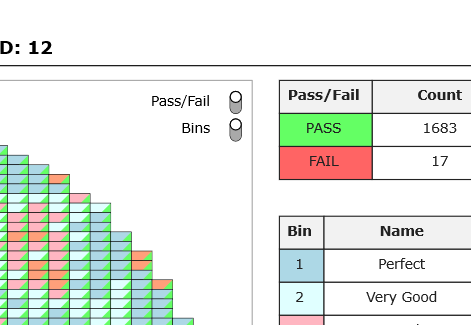
In the next image, both the Pass/Fail and Bins views are turned on.
Each square represents a device, with the color in the top left corner of each device representing the bin associated with the device, and the color in the bottom right corner representing the pass/fail status of the device.

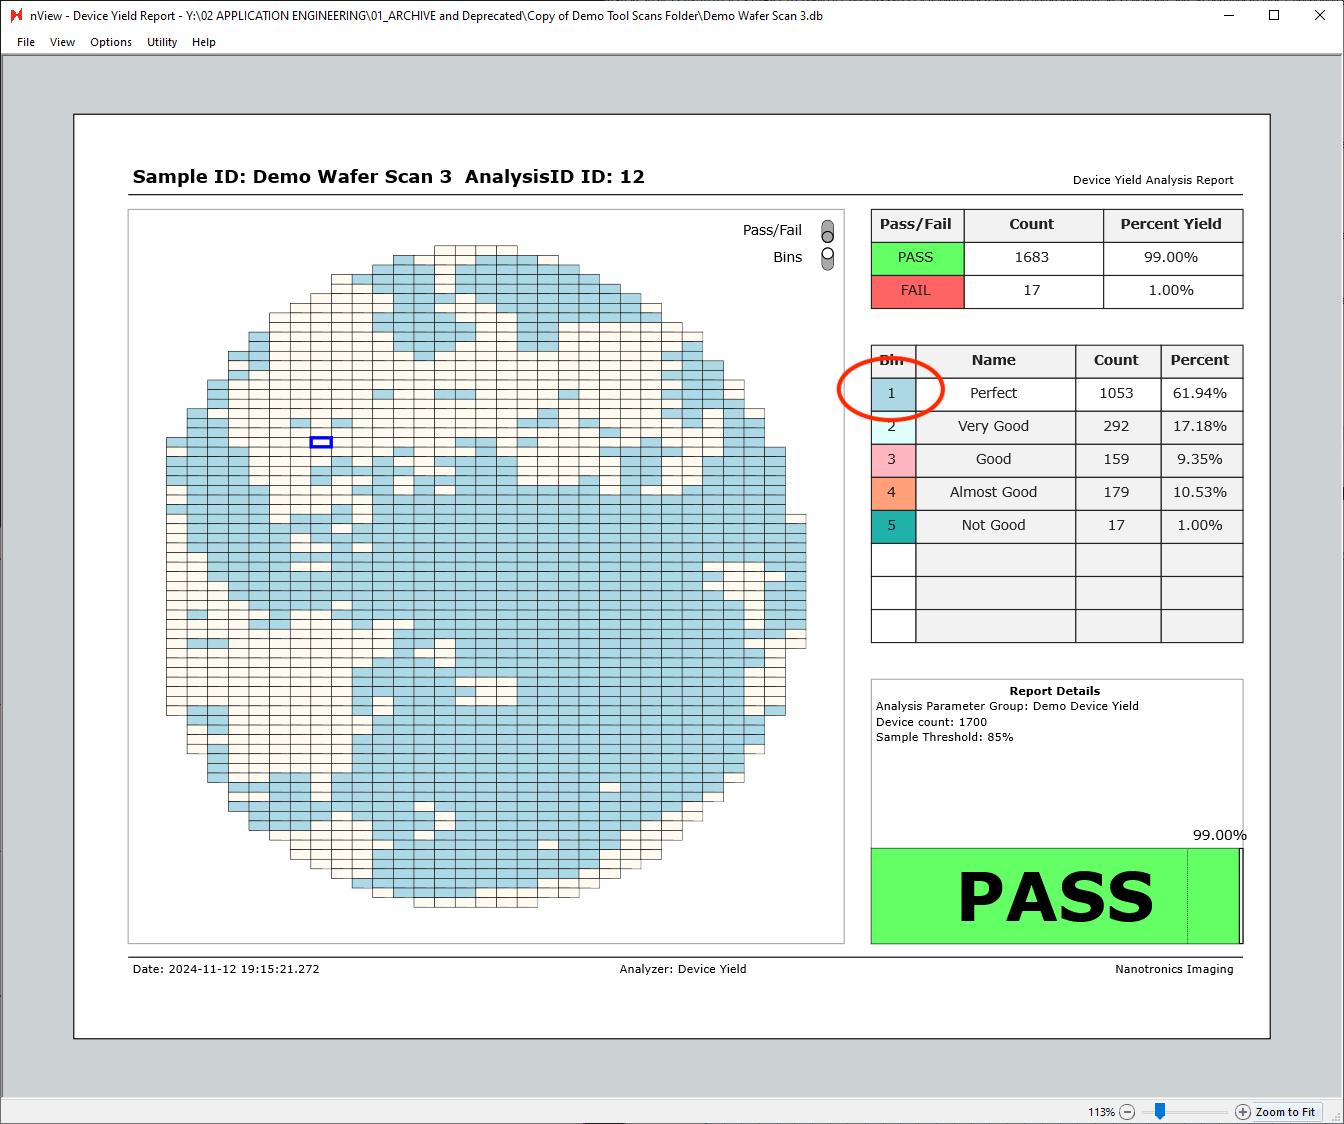
Bins can be toggled off to only show the pass/fail status of each device.

Similarly, Pass/Fail can be toggled off to show the device bins only.
Additionally, hovering over any of the table rows on the right side of the report will highlight the given row’s bin. The view below is with the bins view only enabled, with cursor hovered over the “Bin 1 - Perfect” row.
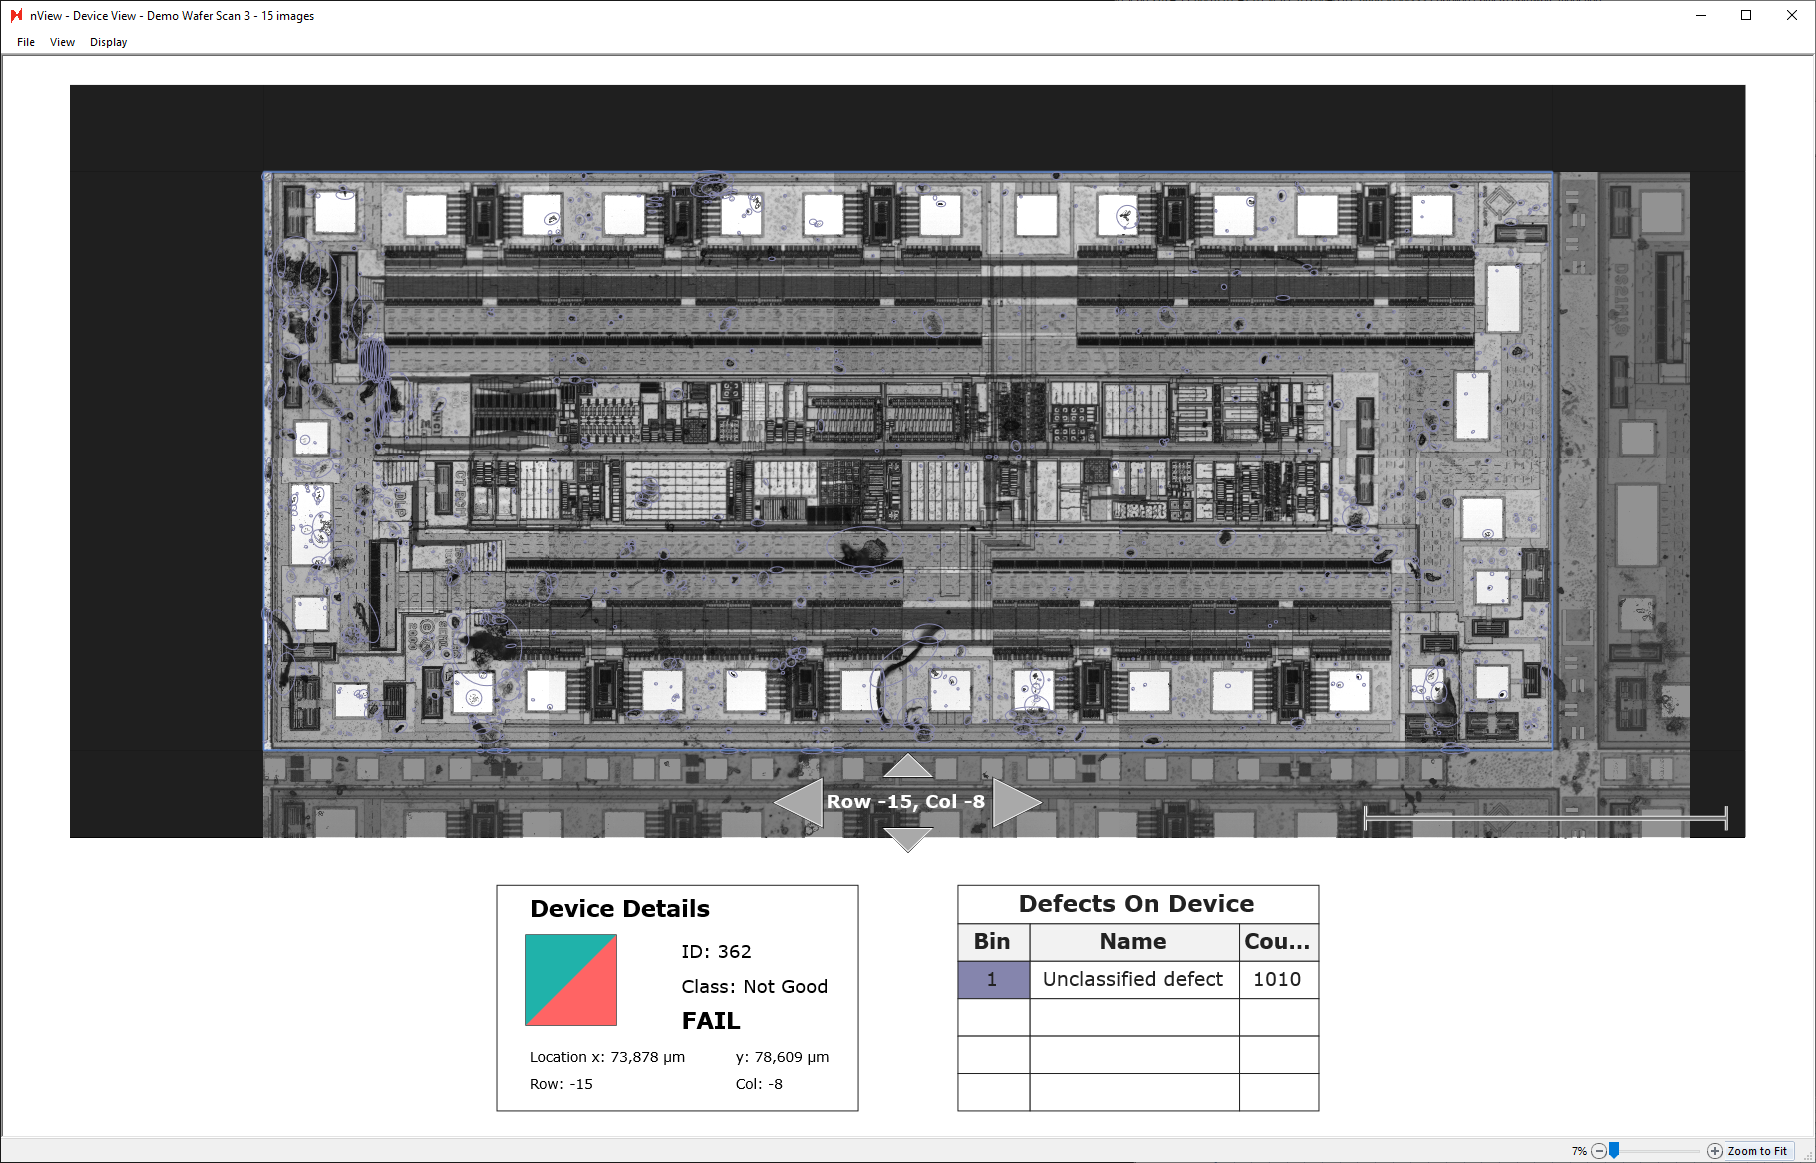
Individual Device View
Individual devices can also be inspected more closely by double-clicking any of the device tiles in the device yield report. Double-clicking a device tile will open a new window of the device view.
Using the up, left, down, right arrows allows you to navigate to view neighboring devices.
Exporting Device Yield Report
Device yield reports can be manually saved and exported directly at nView > File > Save As…
Additionally, they can be exported automatically by placing a Report Summary Image Export after a device yield analysis in an analysis group.
Multi-Sided Sample Scanning
Overview
nSpec CPS systems are capable of performing multi-sided sample scans with the purchase of a wafer-flipping robot module.
Configuration
During initial nSpec setup, a Nanotronics Technical Support Engineer will save autoloader calibration settings for handling and scanning each side of a multi-sided sample. For example, for a double-sided wafer, the engineer would save different autoloader settings for the top and bottom sides of the wafer.
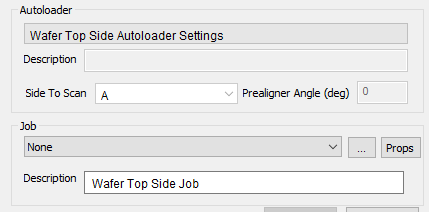
These settings will populate in the Autoloader section of the Scan Settings dialog. Running a multi-sided sample scan necessitates a group job, and each side of the sample needs its own job or scan settings.
Usage
To continue using the previous example of a double-sided wafer, when setting up a job for the wafer’s top side, the autoloader calibration setting for the top side of the wafer is set to Side To Scan value A.
Similarly, the autoloader calibration setting for the wafer’s bottom side is set to Side To Scan value B.
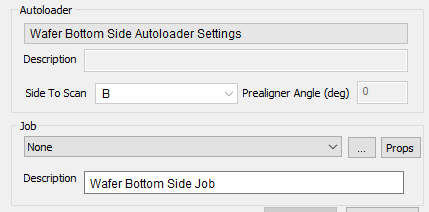
A and B are the default values for the Side To Scan setting, but are arbitrary and can be updated in Callibration.db.
Additionally, all jobs for multi-sided samples must be saved with Job Property KeepAlignerFree set to True.

The job properties dialog is access via the Props button in the Job section of Scan Settings.
After the job for each sample side is saved, all jobs should be added to a Job Group in the order that they should be performed.
New Features
Highlights
NSPEC-6905: Cropped Images Analysis migrated to use standard method of referencing previous analyses
When setting up a Cropped Images Analysis, previous analyses will be referenced with parameters Base Analysis ID Mode and Base Analysis ID. More about this reference system can be read in Appendices: Post - Analysis Referencing.
NSPEC-7957: Add Lot ID to Scan Dialog
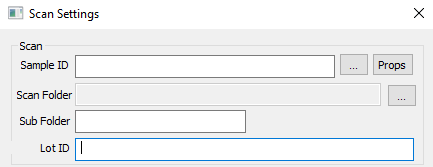
Overview
Lot ID is an optional field that can be set in the Scan Settings dialog. It is saved to the database under Scan Properties.
Lot ID Input Requirements
Must be 260 characters or less
Periods are valid characters, with the exception of leading and trailing periods. For example, “ABC.1”, is valid, but “.ABC1” or “ABC1.” are not valid.
Cannot contain any of the following characters: / \ : “ | > < * ?
Cannot contain tab characters
Cannot end in a space
Cannot be any of the following reserved names: NULL, CON, PRN, AUX, NUL, COM0, COM1, COM2, COM3, COM4, COM5, COM6, COM7, COM8, COM9, COM¹, COM², COM³, LPT0, LPT1, LPT2, LPT3, LPT4, LPT5, LPT6, LPT7, LPT8, LPT9, LPT¹, LPT², and LPT³
Empty strings are interpreted as “No Lot ID Specified”
Additionally, Lot ID is not case sensitive.
NSPEC-8003: Cropped Images Analysis includes Overlay File Configuration Parameter
Overlay Configuration File is an optional parameter for Cropped Images Analysis, which allows users to apply a customizable overlay to exported images. The parameter input type is a nJson file.
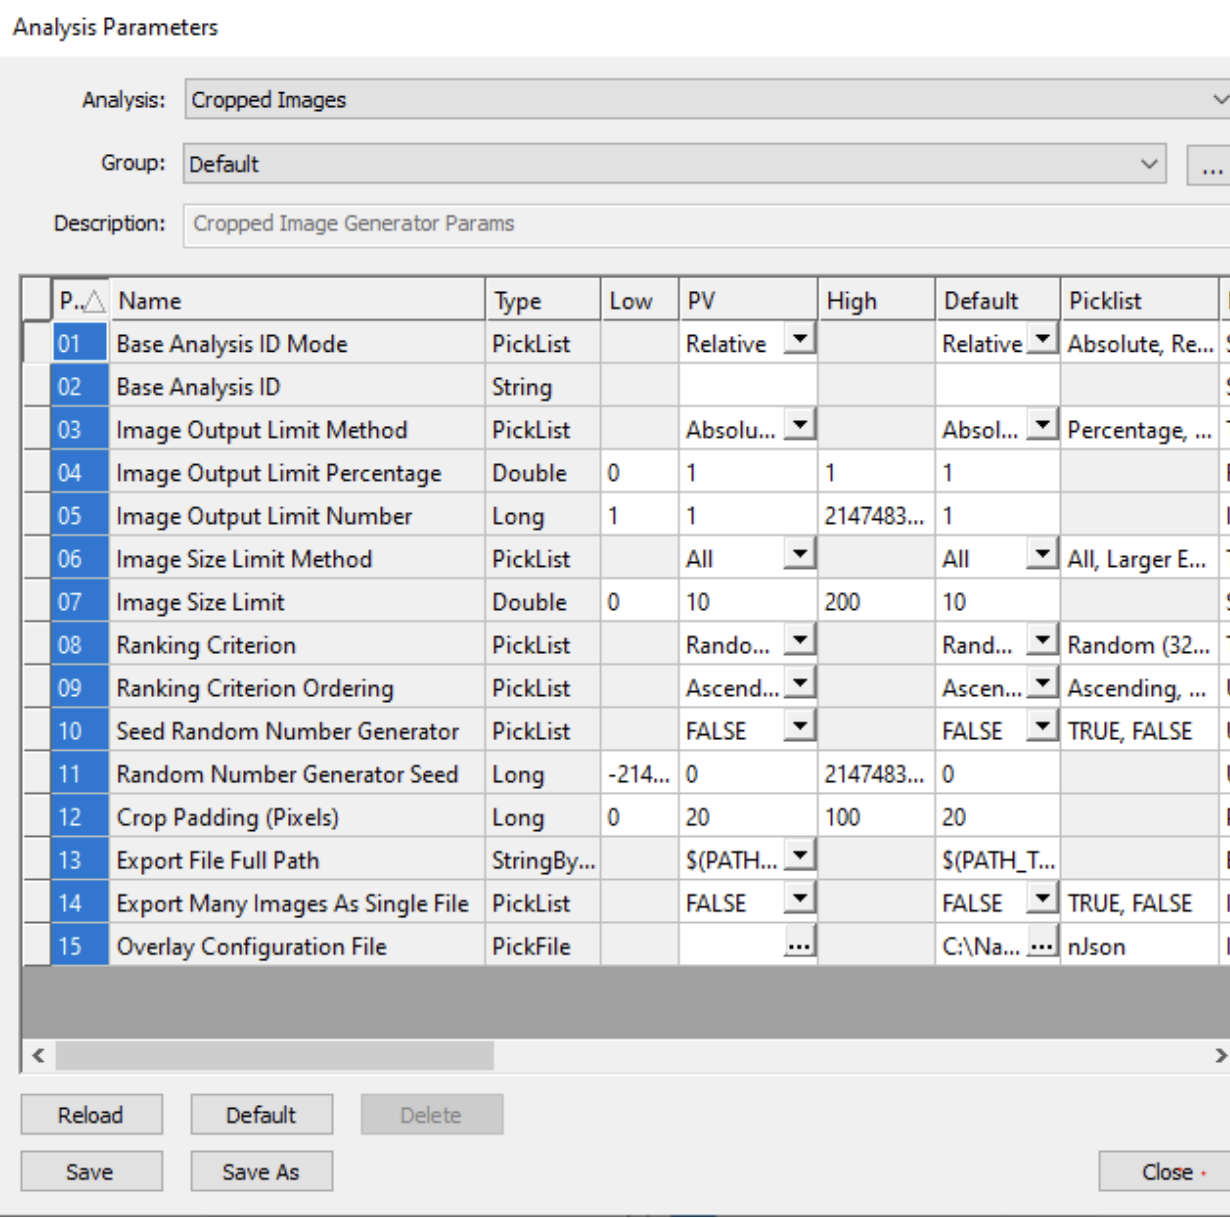
Below is an example nJson file for the Overlay Configuration File parameter.
{
"Overlay Setting" :
{
"semver": "1.0.0",
"viewport_dimensions": {
"rows": 150,
"output_width" : 512,
"columns": 150
},
"background_color": "#666666",
"sidebar_parameters": {
"text_line_vertical_padding": 6,
"text_line_horizontal_padding": 5,
"sidebar_text_scale": 1,
"sidebar_text_color": "#FFFFFF",
"sidebar_width": 450,
"sidebar_position": "left"
},
"scale_section_parameters": {
"bar_top_padding": 10,
"bar_height": 25,
"bar_bottom_padding": 10,
"horizontal_padding_between_label_and_bar": 10,
"horizontal_padding_between_bar_and_edge_of_section": 10,
"scale_bar_color": "#EEEEEE",
"scale_section_justification": "right",
"scale_bar_label_parameters": {
"scale_label_text_color": "#FFFFFF",
"scale_label_text_scale": 0.8,
"vertical_padding_between_bottom_of_label_text_and_bottom_of_section
": 10
}
}
}
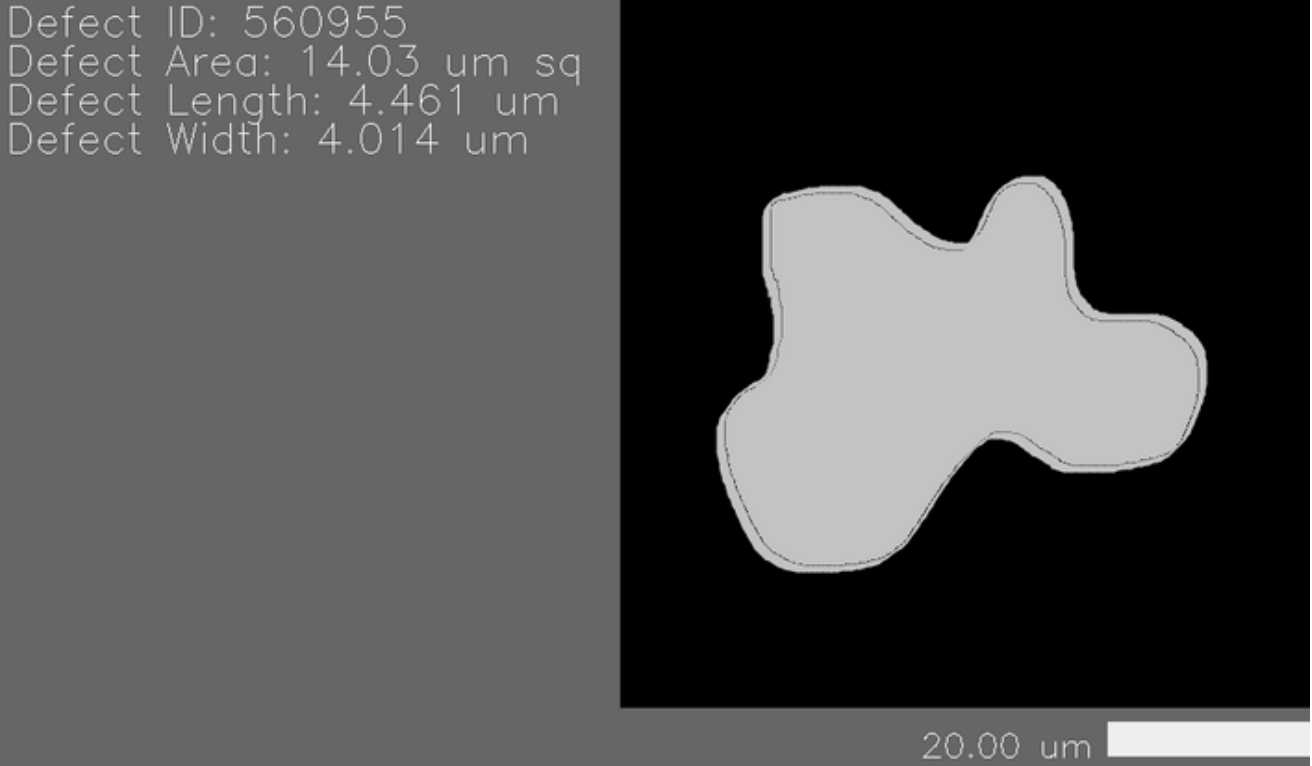
}The above Overlay Configuration File produces the following cropped defect image with overlay. The cropped defect image dimensions, background color, sidebar defect information, and scale and their relative placements are all fully customizable.
semver is shorthand for semantic version, and refers to the version of the defect overlay schema used. Required.
viewport_dimensions sets the size of the viewport containing the cropped defect. Required.
background_color is the background color for the viewport, only used if the viewport size is larger than the cropped defect tile size. Required.
sidebar_parameters sets the size, font formatting, padding, and relative position of the image overlay sidebar, which contains defect information, including the ID, area, length, and width. Required.
scale_section_parameters sets the size and padding for the image overlay scale bar. Optional.
NSPEC-8098: Naming Export Files with String Templates
Export files from Custom Exporter, Cropped Images, and Report Summary Image Export now can be named with string template via the newly added Export File Full Path parameter.
Overview
Users can dynamically name export files using string templates via the Export File Full Path parameter, available for select analyses. Currently, the parameter is available for Custom Reporter, Custom Exporter, Cropped Images, and Report Summary Image Export analyses.
Example String Template Usage
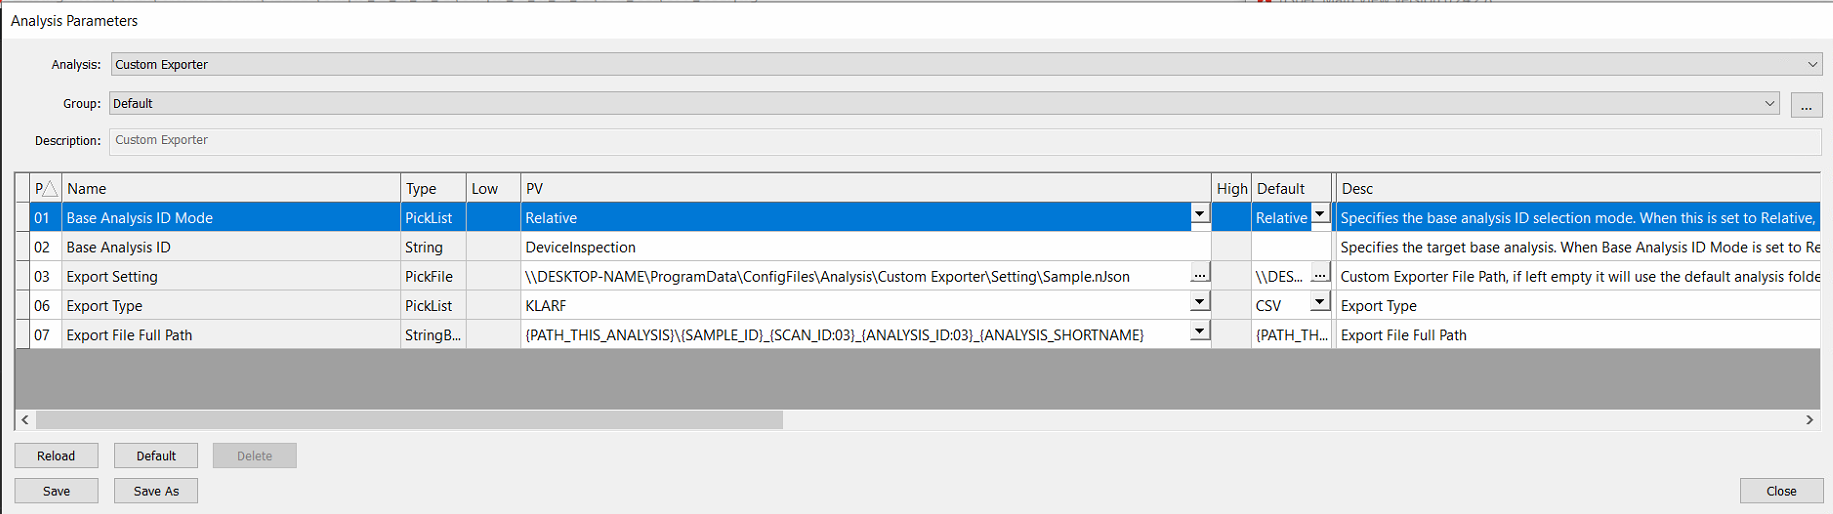
Here is an example of string template usage for the Export File Full Path parameter in Cropped Images Analysis.
The following input: {PATH_THIS_ANALYSIS}\{SAMPLE_ID}_{SCAN_ID}_{ANALYSIS_ID}_{ANALYSIS_SHORTNAME}\defect_{DEFECT_ID}
Results in the following export path:
C:\Scans\ExampleSampleID\Analysis\Analysis_001_002\ExampleSampleID_001_002_Cropped Image Generator\defect_12345
Table of Supported String Templates
Currently, under the Post-Analysis Support column, “All” refers to the analyses that this feature has been implemented for: Custom Exporter, Custom Reporter, Cropped Images, and Report Summary Image Export.
Variable Name | Description | Post-Analysis Support |
|---|---|---|
PATH_DB | Folder that Contains the image database | All |
PATH_SCAN | Scan destination folder, the folder that contains “Scan_001” etc ex: | All |
PATH_ANALYSIS | The incremented analysis destination folder within the scan folder. | All |
PATH_THIS_ANALYSIS | The incremented analysis destination folder within the scan folder. | All |
SAMPLE_ID | Parent scan’s sample ID | All |
MACHINE_NAME | Name of machine (Device name in PC’s settings System → About) | All |
JOB_NAME | Name of job that created parent scan | All |
SCAN_ID | Parent scan’s ID | All |
LOT_ID | References the Lot ID that users can input into the Job | All |
ANALYSIS_GROUP_NAME | Parent group analysis' name (error if analysis is not part a group analysis) | All |
ANALYSIS_ID | Analysis' ID | All |
ANALYSIS_SHORTNAME | Analysis' IntName as shown in Main View → Utility -> Edit Analyses... | All |
ANALYSIS_DISPLAYNAME | Analysis` Name as shown in Main View → Utility -> Edit Analyses... | All |
DATETIME | Analysis' completion time with format: | All |
TARGET_ANALYZER_DISPLAYNAME | Target analysis' Name as shown in Main View → Utility -> Edit Analyses... | All |
TARGET_ANALYZER_SHORTNAME | Target analysis' IntName as shown in Main View → Utility -> Edit Analyses... | All |
TARGET_ANALYSIS_DATETIME | Target analysis' completion time with format: | All |
TARGET_ANALYSIS_ID | Target analysis' ID | All |
DEFECT_IMAGE_ID | Cropped defect’s parent image ID | Cropped Images |
DEFECT_DEVICE_ID | Cropped defect’s parent device ID | Cropped Images |
DEFECT_DEVICE_NAME | Cropped defect’s parent device name | Cropped Images |
DEFECT_ID | Cropped defect’s ID | Cropped Images |
DEFECT_CLASSIFICATION | Cropped defect’s classification name ( | Cropped Images |
TARGET_ANALYSIS_DESCRIPTION | Reporting image export’s Report Type | Report Summary Image Export |
New Features Changelog
Bug Fixes
Changelog
Known Issues
Known Issues Summary
NSPEC-8217: Cannot run scans with old image setting group that uses RGBW light source
This bug only affects customers with transmitted RGBW light sources. Get in contact with Nanotronics Technical Support at support@nanotronics.co for assistance working around this bug.
NSPEC-8241: Error after switching objectives during autofocus for Vieworks camera
Scans fail with a GenTL error in systems with Vieworks cameras after switching objectives during autofocus.
NSPEC-8263: Cannot enable hardware triggering on ACS stages
Systems with ACS stages are unable to initialize due to an error during the camera hardware triggering test.
NSPEC-8293: nScan Race Condition Crash on Boot
There is a race condition during boot that causes nSpec to crash.
NSPEC-8216: nDraw Crashes on Launch
After internal database changes introduced by v0.24.0.0, nDraw currently crashes. This primarily impacts new recipe setup of workflows involving Virtual Device Inspection. If this impacts your workflow, contact support@nanotronics.co for information.
NSPEC-8310 & NSPEC-8315: Precision Scanning Errors
There are several errors starting in v0.24.0.0 that block some portions of the precision scanning / precision autofocus workflows. Specifically, applying an autofocus mask, and use of automatic light intensity adjustments. Fixes for these items are planned for upcoming software patch version 0.24.0.2.