nSpec v0.25.0.0 External Release Notes
nSpec Version 0.25.0.0
Release Date:
Documentation Updated:
Major Features: Gen V AI, SMIF Handling, Milara Robot, Cassette Presence, Improved Rotation Accuracy, and more
Overview
The nSpec Version 0.25.0.0 release introduces several significant enhancements
Major Features
Gen V AI: A new generation of transformer-based artificial intelligence, for improved accuracy and enhanced inspection throughput.
SMIF Handling: Introduction of SMIF (Standard Mechanical Interface) Pod handling for 150mm and 200mm wafer samples.
Milara Robot: Introduction of the Milara Robot, a new best-in-class robot for wafer handling in CPS systems
Cassette Presence: New features related to cassette presence detection & Cassette ID handling have been added.
Improved Rotation Accuracy: Enhancements in camera rotation accuracy should yield improved precision during alignment operations.
Upgrading to v0.25.0.0
Library Update Required
This version does require library updates to enable Gen V nTelligence. All dependencies can now be packaged for offline installation via nTest. For more information, please contact support@nanotronics.ai.
Major Enhancements
Gen V AI
Gen V AI is nSpec’s next generation of AI models, built on the latest transformer AI technology. It represents a paradigm shift in Nanotronics' AI technology, with improved out-of-the-box detection, classification, and speed. Additionally, Gen V features quality of life improvements that will make training models more efficient than in Gen IV. Most notably, Gen V enables per-class confidence and IOU configuration, a long awaited capability that has been one of the most frequently-requested features across all of nSpec.
A guide to getting started with Gen V AI can be found here:
SMIF Pod Handling
The nSpec CPS can now support automated handling for 150mm and 200mm SMIF Pods! To add this capability, several new hardware modules have been incorporated into the nSpec CPS EFEM. This includes the following:
NSPEC-8745: SMIF Versaport 2200 Integration
This load port handles 200mm SMIF pods. It is an Asyst Technologies system that is procured via Brooks. For more details, please refer to the hardware page:
Asyst - Brooks | SMIF VersaPort INX 2200
NSPEC-8746: SMIF 150mm Indexer Integration
This load port handles 150mm SMIF pods. It is an Asyst Technologies indexer enhanced with an elevator for compatibility with nSpec CPS EFEM systems. For more details, please refer to the hardware page:
https://nanotronics.atlassian.net/wiki/x/LQAV-w
NSPEC-9043: Milara Robot Integration
This new robot is compatible with nSpec CPS systems equipped with Modular Autoloaders. It can transfer variable sizes of wafers, and is suitable for high volume production environments. For more details, please refer to the hardware page:
New Features
Highlights
NSPEC-8671: Use BWA Information for Wafer Edge Exclusion/Inclusion
This update enhances the wafer scanning process by utilizing Bare Wafer Alignment (BWA) properties to accurately exclude or include defects at the wafer edge. Previously, this was done using properties generated by the Wafer Prediction analyzer, which could be incorrect if not run. The new approach ensures that the necessary properties for edge exclusion/inclusion are derived from BWA, improving accuracy and reliability in defect analysis. This change is particularly beneficial for scenarios where Wafer Prediction analysis is not performed, as it leverages existing BWA data to avoid redundant processing and potential errors.
NSPEC-8974: Install Gen IV Environment to Versioned Folders
Gen IV and Gen V Analysis have dependencies that require clean distinction between environment versions. This change was necessary to enable side-by-side usage of both Gen IV and Gen V AI analyzers. There should be no difference in user experience, however it is worth noting that you may observe the environment is in a new location following this update.
NSPEC-8926 & NSPEC-9047: Add Cassette Presence Detection via GEM for Loaders & Load Ports
We've enhanced the nSpec system by adding cassette presence detection for SMP loaders and Load Ports using GEM. These changes add loaded/unloaded carrier and cassette detection, for the following load ports:
Asyst Versaport 2200
Asyst Indexer 2150
TDK TASPLP
Nanotronics Load Station
Nanotronics Autoloader2
Nanotronics Autoloader3 Gen2
When a cassette or carrier is placed, the GEM host should receive a ACEID_LOADPORTSTATECHANGETOLOADED (5020) event. When a cassette or carrier is removed, the GEM host should receive a ACEID_LOADPORTSTATECHANGETONOTLOADED (5021) event. Upon receipt the GEM host can immediately query the data variables DVVAL_LoadPortCassetteStates (9121) and DVVAL_LoadPortStateChangeID (9122) to get the current load port cassette states and the id of the load port that triggered the event.
The load port cassettes states value is a string of characters of this form, showing the state of all installed load ports:
”LoadPortId=[LOADED|NOT_LOADED], LoadPortId=[LOADED|NOT_LOADED],…”The LoadPortId reflects the installed load port type:
Asyst VersaPort 2200 = ASYSTVERSAPORT
Asyst Indexer 2150 = ASYSTINDEXER2150
TDK_TASPLP = TDK
For more information, refer to the Application Defined Variables section of the SECS/GEM API Reference
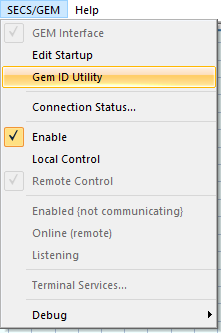
NSPEC-9080: Barcode Window for GEM Messages
Operators now have the option to scan in a Barcode value to send to a GEM Host. This is intended to enable workflows where a GEM Host determines the correct nSpec Job to perform on this cassette based on its ID and current status from a centralized record source.
The window is available in the GEM dropdown menu in the nScan Window under the name GEM ID Utility, and is only available if GEM is enabled. Operators can enter the cursor in the text field, and use a barcode scanner to read the ID Code from a sample or cassette.
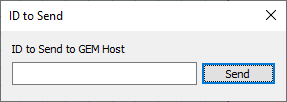
Once an operator hits the Send button, the following happens:
A GEM Event is emitted:
Event Name:
ACEID_NewOperatorInputIDEvent ID: 5025
A GEM Variable is set:
Variable Name:
DVVAL_OperatorInputIDVariable ID: 9126
Once the GEM host receives the 5025 event, it can use the S1F3 stream function to query the 9126 variable. The response can be used to determine subsequent actions and commands to send to nSpec.
NSPEC-9113: Improve repeatability of camera rotation
Repeatability should be improved for < 0.1 degree theta rotations. In previous versions a 0.05 degree parametric move will likely not change the image, whereas that should now move the edge of a field of view by a couple pixels, and you should observe improved consistency. This feature pairs well with NSPEC-9179 for a marked improvement in device scanning positioning consistency.
NSPEC-9143: nSpec Status Monitor
The nSpec Status monitor is an electrical board that customers can connect to with AUX connectors for a readout of nSpec EMO state and nSpec Software Status. It is compatible with all nSpec models, and is a new optional add-on available for tools. In production environments, this can be used as a single source of truth for monitoring the tool hardware and software production readiness status. The board also enables remote EMO for the nSpec hardware. For more information, please refer to https://nanotronics.atlassian.net/wiki/x/AQC9-Q
New Features Changelog
Bug Fixes
Highlights
NSPEC-8896: Cancel Sample and Cancel Scan result in same behavior during group job
For group jobs in v0.24.1.4, toggling either the Cancel Sample and Cancel Scan buttons would result in the same behavior.
With this fix, Cancel Scan has been renamed to Cancel All for clarity.
Clicking Cancel Sample will end the current and all pending jobs in the group job for the sample, and the sample will be returned to the cassette. Clicking Cancel All will cancel all jobs for the entire cassette.
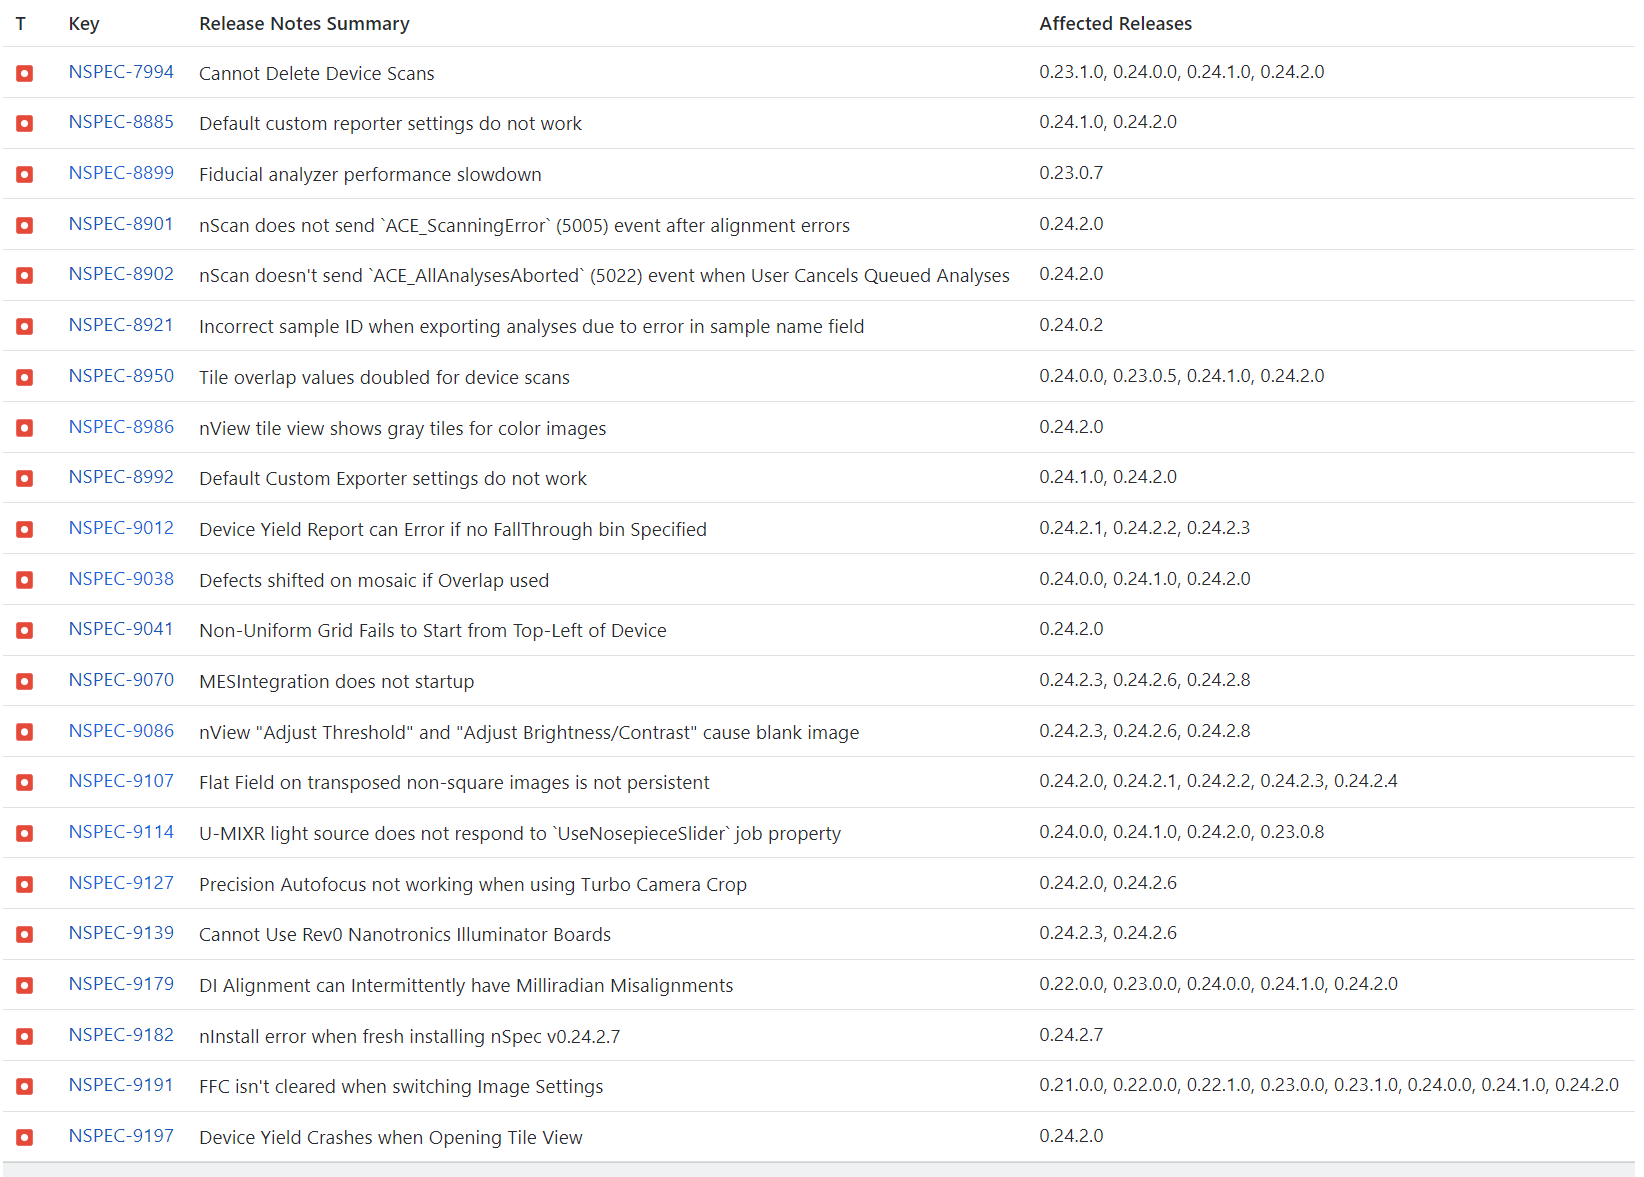
NSPEC-9012: Device Yield Report can Error if no FallThrough bin Specified
Prior to this fix, if a Device Yield nJson file specified a non-existent id as its FallThrough bin, nView would fail to properly render the Device Yield report. This fix adds additional integrity checks, and fails the analysis if the FallThrough bin is improperly specified. nView will also fail with more informative messages to help correct the issue within the nJson file.
NSPEC-9068: nView cannot open line-type defect reports
Prior to this fix, nView would crash if you attempted to open a line-type defect report.
NSPEC-9017: Flat Field on transposed non-square images is not persistent
Following recent enhancements to the handling of binning within flat field correction, an edge case existed where flat fields would not persist across nSpec sessions if the following were true:
Camera Crop was non-square
Transpose Images = 1
Flip Images Vertically = 1
NSPEC-9139: Cannot Use Rev0 Nanotronics Illuminator Boards
We have two versions of the Nanotronics Illuminator board (common to nSpec PRISM tools). The original revision (referred to as revision 0) has VID/PID = 16D0/0F88. We eventually added the capability to control lights on this board but we wanted to make a distinction between ones that could and could not control lights, so we made a second VID/PID pair (3628/0002) and considered this board revision 1.
Most functionality is the same on these two boards, the only difference being light control is available on revision 1. However, the software is checking that either board exists, and then tries to connect to a revision 1 board. That means if you have a revision 0 board, you pass the first check and then fail to connect to revision 1 board that does not exist on the tool. This blocks startup. This issue has now been corrected.
NSPEC-9179: DI Alignment Misalignments
We have learned that there was a bug within our north-south alignment routine that could cause an extremely small misalignment of the south fiducial on the order of 0-5 pixels. The end impact observed was that the scan position may be several pixels shifted from the desired position. In most applications the error is well within Device Inspection Analysis positional tolerances, however there are some low-tolerance applications where this misalignment did cause intermittent false positive defect detections. This alignment error has now been corrected.
NSPEC-9182: nInstall error when fresh installing nSpec v0.24.2.7
nSpec version v0.24.2.7 does upgrade and perform nominally, however if performing a fresh installation a bug within the installer prevents successful completion. For this reason, v0.24.2.7 is not being distributed and instead we are jumping to version v0.24.2.8 for general release. Version v0.24.2.8 rolls together features and bug fixes from both versions.
NSPEC-9191: FFC Isn’t cleared when Switching Image Settings
This previously only occurred in the event a given flat field configuration was missing. For example, for a given permutation of objective, slider state, illumination type, binning, and color format, nSpec previously claimed to load the default flat field configuration (which is simply gain == 1 and offset == 0), but actually had not since the default configuration was never prepared. The effect of this was that images would be captured with a previous flat field setting, incorrectly mapped - this could lead to instances of slightly bright or dark spots, or poor vignetting. This issue has now been corrected.
Changelog
Appendices
Appendix A - Gen V AI
Overview
Gen V AI is nSpec’s next generation of AI models, built on the latest transformer AI technology. Gen V models have been pre-trained and can detect defects out-of-the-box. Additionally, Gen V features quality of life improvements that will make training models more efficient than in Gen IV.
Usage
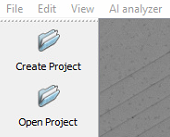
Create or Open Project
First, create a new project, or open an existing Gen IV AI project folder. Note that Gen IV AI models are not compatible with Gen V AI Analysis, but Gen IV project files can be opened and retrained as Gen V models.
Import Images
Next, if creating a new project, import images for training at File > Import Images > Image Directory.

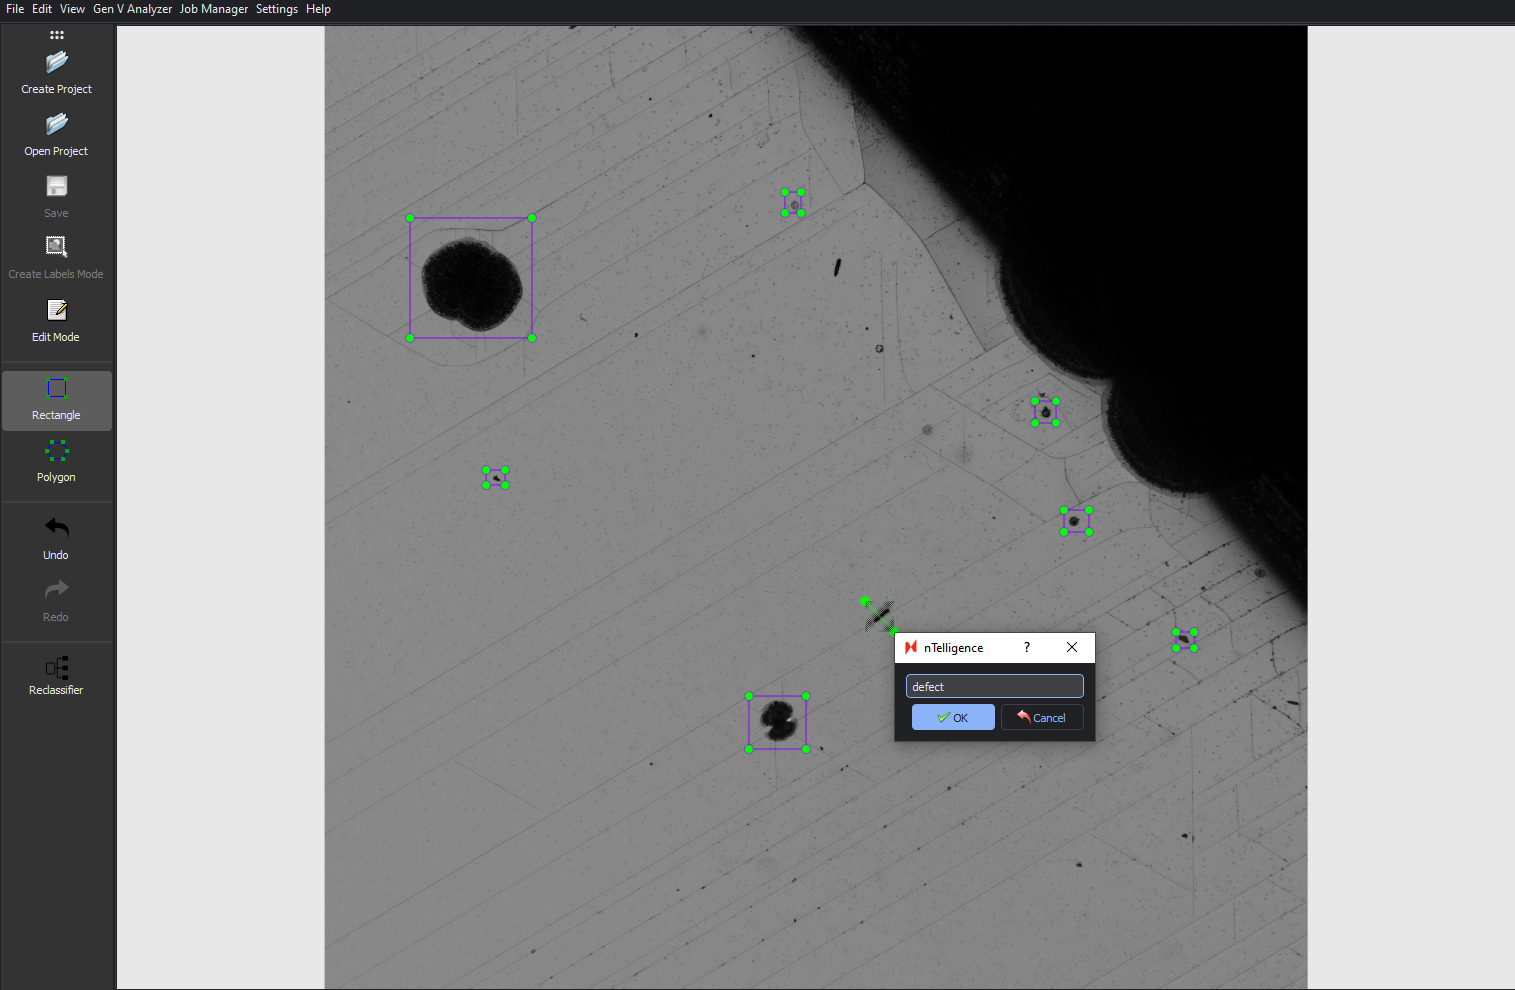
Label Images
Next, you will need to label all defects of interest in all training images by selecting defects with your cursor. An in-depth guide on labelling best practices can be found at Gen IV AI Training Guide.
Drag and drop to make your selection, then label with the name of the defect class.
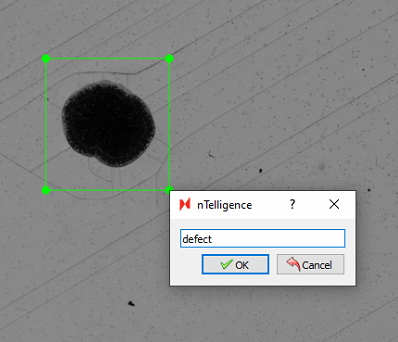
You must label all defects in all images for optimal training results. Make sure to Save any labels created on a given image before labelling other images.
Enabling Edit Mode will allow you to resize, reposition, or delete any labels.
Model Selection
After labeling images, select an AI model framework to train on from the menu located at Gen V Analyzer > Train.
There are three categories of models – Falcon, Dolphin, and Mammoth. Falcon models are the smallest in size, which means that training and classification times are shortest. Dolphin models are mid-size models. Mammoth models are the largest – they run the slowest but are the most accurate models.
We recommend that you start training with the Falcon_Tiny model, and increase to the Falcon_Small, then Falcon_Medium, and ultimately the Falcon_Large model size if necessary. If the Falcon models are not adequate, we recommend the Dolphin models, then the Mammoth models, starting with the smallest model in each category.
.png?inst-v=454627e2-1d83-49ee-8847-4415396929d9)
Selecting Training Parameters
This dialog allows you select parameters for training your AI model. After selecting parameters, click Train to start training.
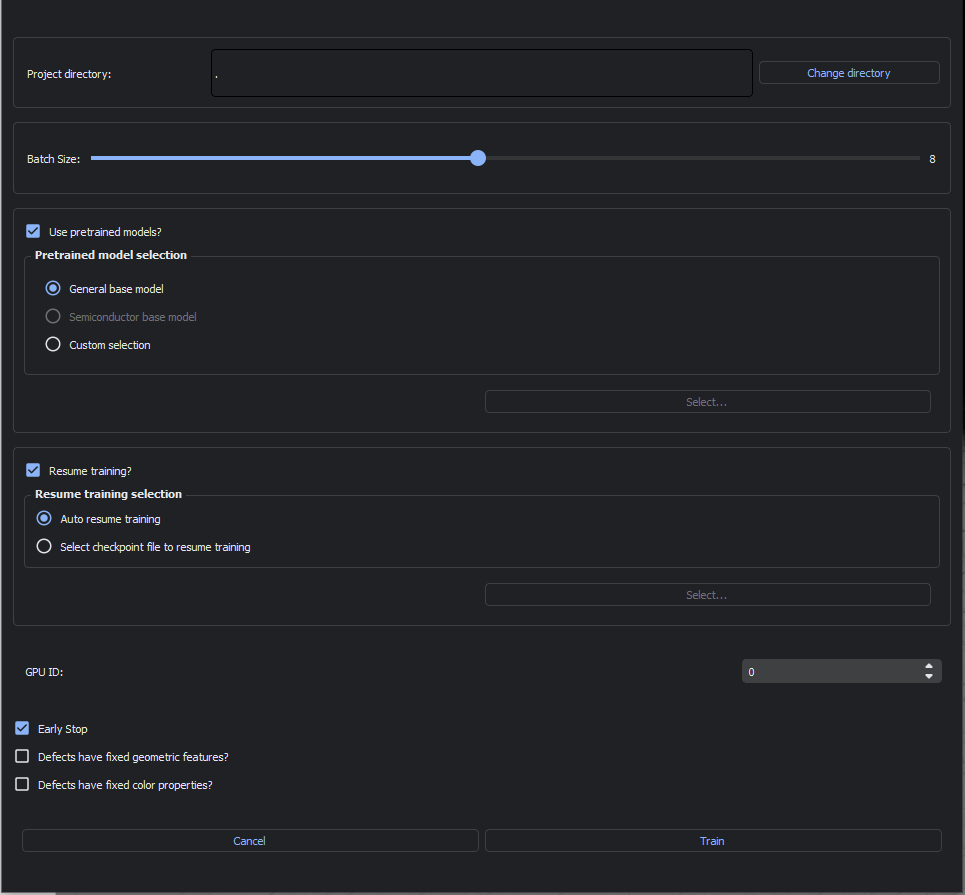
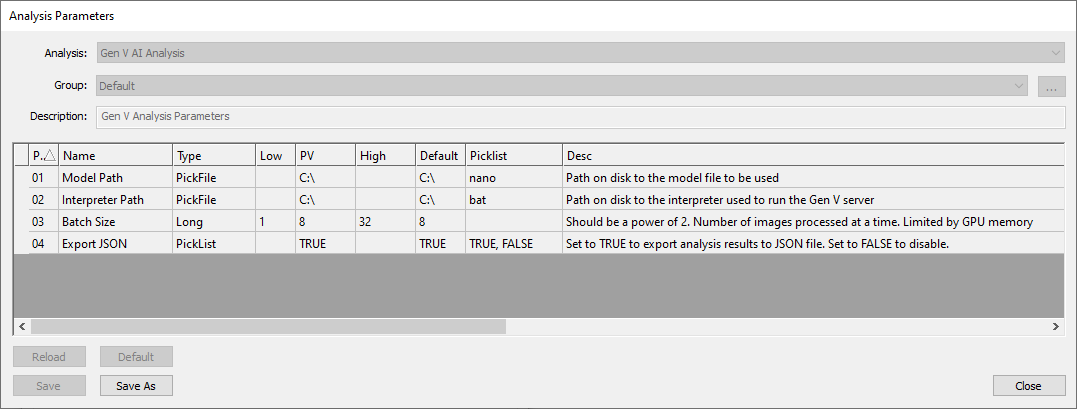
Batch Size
Batch size refers to the number of images processed during a single training iteration. It can be adjusted using the sliding input. The maximum batch size is automatically set based on your computer’s GPU size.
Pretrained Model Selection
We highly recommend enabling the Use pretrained models? option. Otherwise, you will be training a model from scratch. You can chose from the following pretrained models to begin training on:
General base model, a basic model ideal for general use cases.
Semiconductor base model, a specialized model for semiconductor defects.
Custom selection, only for use with custom trained models generated by Nanotronics applications engineers.
Resume Training Selection
Choose how nTelligence will proceed in case of any errors during training:
Auto resume training, which will allow you to resume training from the most recently completed training iteration.
Select checkpoint file to resume training, which will begin training at the selected training checkpoint.
GPU ID
This selection allows you to choose which GPU to use for training.
Early Stop
If Early Stop is enabled, will end training if the model converges before training is completed. Convergence is achieved when the loss function is at a stable minimum. This means that the model training is sufficient and further training will not significantly improve the model predictions.
Defects have fixed geometric properties?
This option should be enabled when your samples have consistent geometric properties, for example, if you have crystalline slipline defects that occur at fixed angles, or certain defects that occur at fixed sizes, check this box.
Defects have fixed color properties?
This option should be enabled when your defects of interest are always the same color. For example, if you have particle defects that are always black, you should check enable this option.
Training Model
After configuring training parameters,
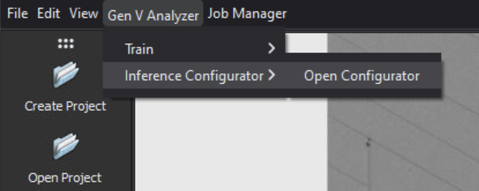
Refining Model
After training a model, you can quickly tweak a few of the model’s parameters without re-training in the Inference Configurator. To open the dialog, navigate to Gen V Analyzer > Inference Configurator > Open Configurator.
Setting up the Inference Configurator
Use Select Folder to select an image scan folder with the training or testing data.
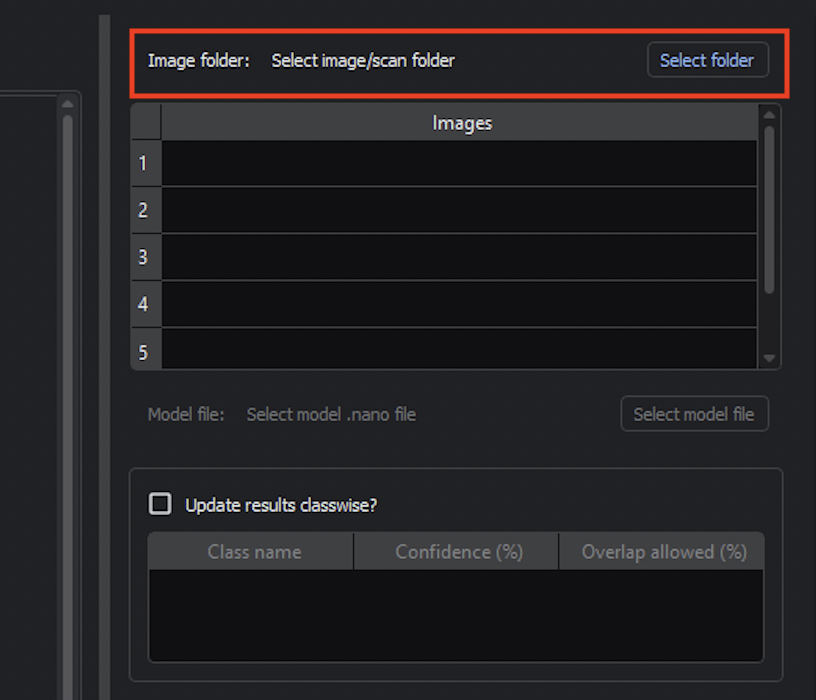
Use Select model file to select the model you just trained. The model should be located within the project directory. For example, a model might be located at project_directory/gen_v_training/falcon_tiny/2025_01_23_20_12_22/epoch_100.nano.
There is checkpoint model file saved every 10 epochs during training. We recommend using the last model file.

Navigating the Inference Configurator
You can navigate between different images using Prev and Next or directly select an image in the Images navigator.
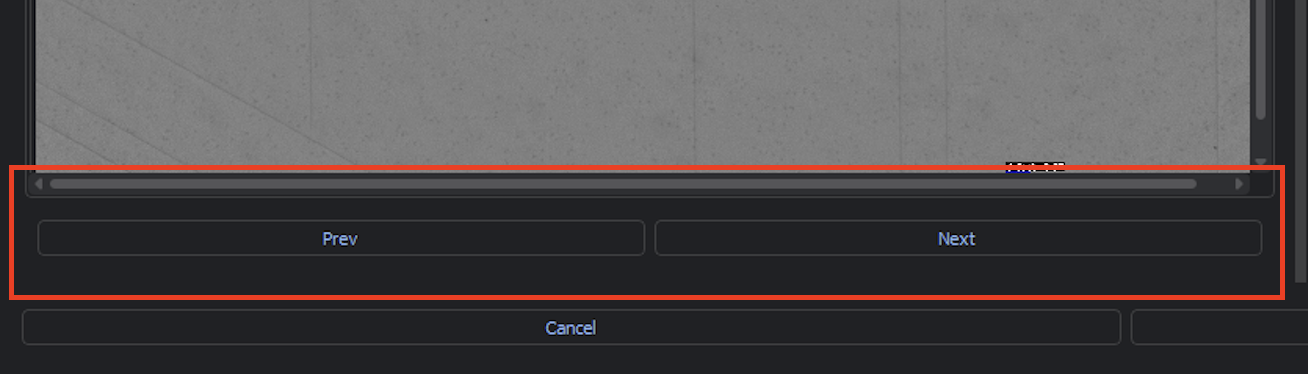
Additionally, you can zoom in on the current image using the slider input. You may also click within the bottom right view of the image to zoom in to different parts of the image.
%20A.png?inst-v=454627e2-1d83-49ee-8847-4415396929d9)
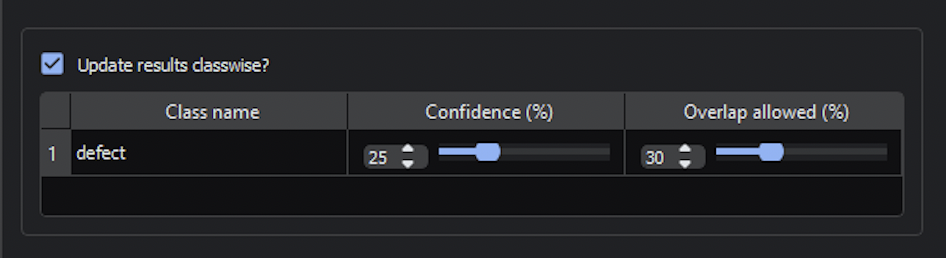
Adjusting Confidence Interval and Allowed Overlap Percentage
For each class, you can adjust the Confidence interval and Overlap allowed percentage. You must enable Update results classwise? to change these values.
After the initial model training, by default the Confidence percentage is 25% and Overlap allowed percentage is 30%.
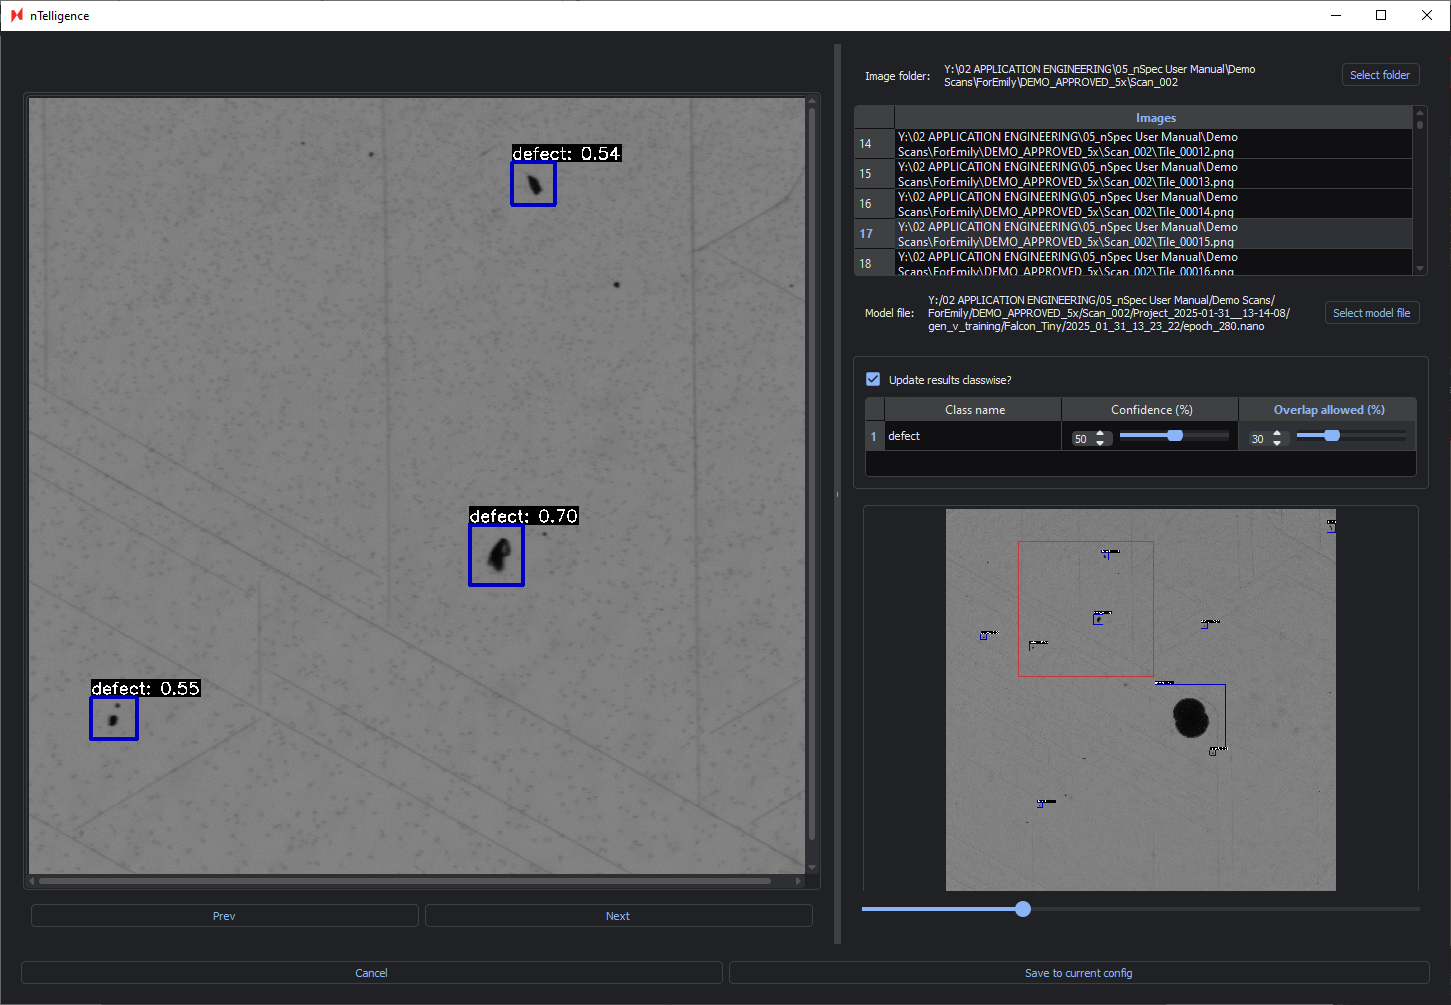
Adjusting the Confidence will adjust the model’s minimum confidence threshold for classifying a given defect. Each defect is labelled with its classification and confidence interval.
For example, here is one image with the default parameters:

Adjusting the Confidence percentage will show you in real-time which defects are identified or ignored when changing the confidence interval.
Below is the same image with an increased Confidence of 50% and the same Overlap allowed percentage. Only defects classified with 50% confidence or higher are labelled.
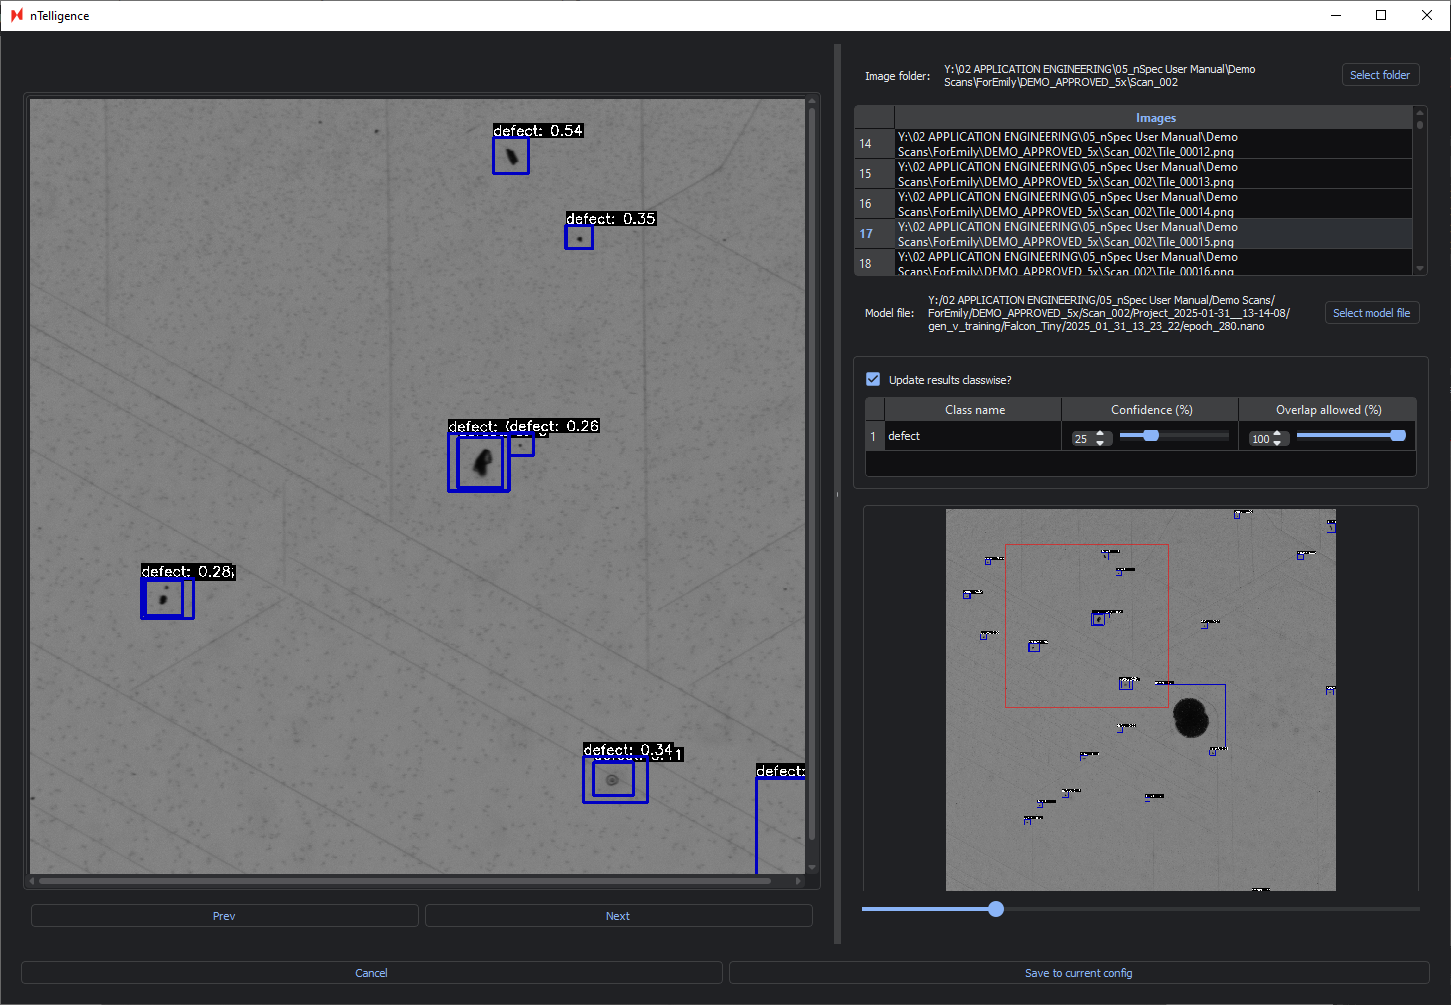
Adjusting the Overlap allowed percentage adjusts how much overlap in defect bounding boxes is allowed before defects are considered a single defect.
Having a high Overlap allowed percentage is recommended when identifying continuous defects like sliplines, whereas having a lower percentage is ideal for identifying discrete points.
In the image below, the Confidence is set to 25% and the Overlap allowed to 100%. You can see that this results in overlapping bounding boxes.
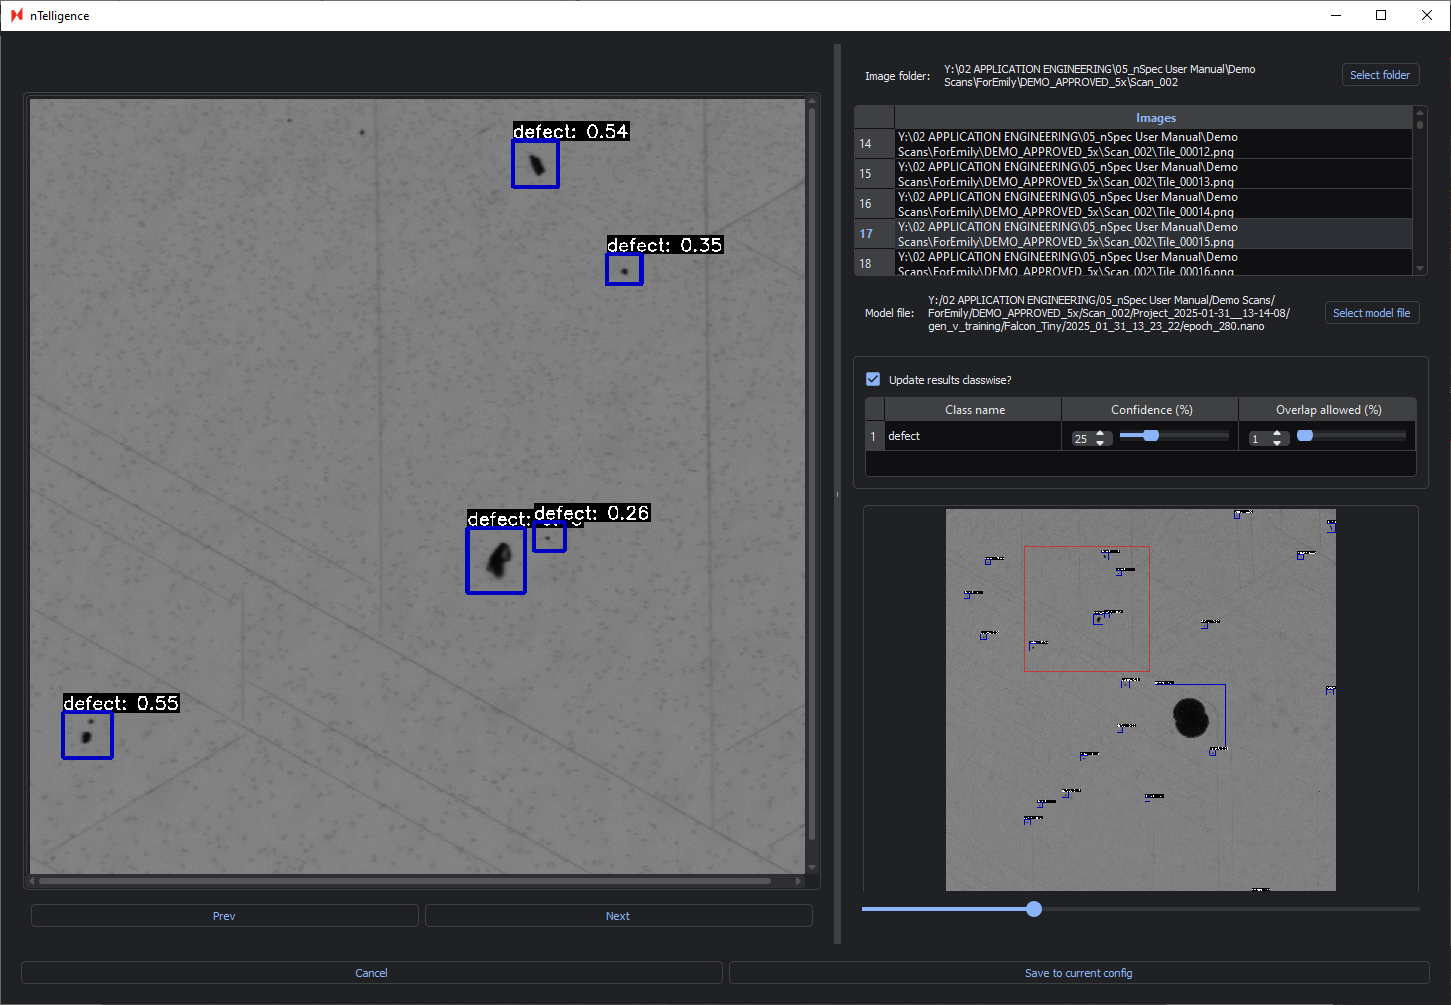
In the following image, the Overlap allowed has been decreased to 1%, meaning there can be very minimal overlap between bounding boxes. The Confidence remains at 25%.
Deploying Model
After adjusting the Confidence and Overlap allowed parameters, make sure to Save to Current Config. These parameters will be saved to the .nano model file.
When running a Gen V AI Analysis in nSpec, make sure to point to this .nano model file using the Model Path parameter. You cannot point to a .nano model file trained with Gen VI AI here.
Additionally, you must point to C:\Nanotronics Imaging\nTelligence\application\6.2.6\run_inference.bat for the Interpreter Path parameter.